General PIC transfers placement rules
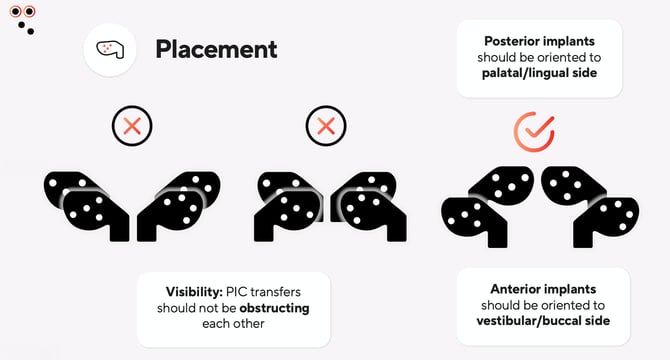
The goal of a correct placement is to prevent PIC transfers from obstructing each other, ensuring maximum visibility of all of their optical dots from multiple angles during capture.
Correct PIC transfer placement accounts for 80% of a successful capture, whether you are using a PIC system or PIC app.
- Distal (posterior) PIC transfers: Position the two most posterior PIC transfers facing the palatal/lingual side (toward the inside of the mouth).
- Anterior PIC transfers: Orient all remaining anterior PIC transfers toward the vestibular/buccal side (toward the outside of the mouth).
 Avoid excessive parallelism: Maintain a slight angulation of 10-25º degrees between opposite PIC transfers (distal ones angled towards the back of the mouth and anterior ones towards the outside of the mouth) to minimize reflections and improve visibility.
- Alternate orientation in crowded cases: If implants are very close together, alternate PIC transfers orientation to keep all optical dots visible.
It is normal to have to reposition the PIC transfers at the beginning of the case. Make sure you define the optimal order before starting the capture, because readjusting the PIC transfers later will slow down the workflow, and incorrect PIC transfer placement is one of the main reasons why a capture may not progress as intended.
Combining PIC transfers Standard and PIC transfers Mini in the same case
PIC transfers Standard and PIC transfers Mini can be combined in the same case to improve dot visibility during capture. It's very advantageous if you work with more than five implants at a time.
 Use PIC transfers Standard in distal positions (larger = easier visibility).
- Use PIC transfers Mini in anterior positions (smaller = fewer obstructions and more space).
This allows you to position Mini-sized PIC transfers in the front, where you might have more space or more implants, while keeping the Standard-sized PIC transfers in the back, as the smaller Minis will not obstruct the visibility of the Standard transfers.
You can use up to 5 PIC transfers Mini plus up to 10 PIC transfers Standard in the same case. Read this article on how to combine multiple PIC transfer kits.
How to apply PIC transfer torque
 Check the torque of the multi-units before screwing the abutment-level PIC transfers on top.
-
Make sure each PIC transfer has enough torque to remain fully static. Stop screwing the PIC transfer once you get to a hard stop.
- Once tightened, they should not rotate by hand.
IMPORTANT: The max torque value for the PIC transfers is 10Nm. Do not exceed this limit under any circumstances, as it might damage the PIC transfer. It is also not recommended to use electric screwdrivers with PIC transfers. Use a manual tool, like a standard Torx screwdriver.