How to prepare and validate a PIC file in PIC cloud
-
Capture the PIC file
- Use PIC app to capture the initial PIC file.
- A PIC file contains a measurement of directional vectors for each implant position and angulation. To export it, scan markers must be assigned to each position.


-
Associate scan markers
- Choose scan markers—such as healing abutments or implant head geometries—that match the components that were physically scanned in the patient's mouth with an intraoral scanner after the PIC file capture.
- If you're using PIC app, tap and hold on any of the arrow vectors representing implant positions in the 3D preview to initiate scan marker assignment.
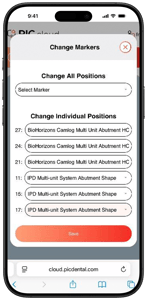
- If you're using PIC cloud, tap on the “Change markers” button and select the appropriate scan markers.
-
Validate the case
-
Log in to your PIC cloud account from a smartphone or a computer by opening the page https://cloud.picdental.com in a web browser.
-
You can access a filtered list of your cases that are pending validation by tapping on the red Pending circle on PIC cloud's Dashboard. You can also access your full case list by tapping the menu icon available in the upper left corner of PIC cloud and tapping on PIC cases.

-
On the PIC cases page, tap on the case that you would like to validate. The case page will load with a 3D preview of the PIC file and several buttons. Tap on “Validate Case” to begin the validation. On smartphones, the button will appear on top of the 3D preview. On larger devices, the button will appear to the right of the 3D preview.


-
A pop-up window will display the total cost of validating the current case. If the case was shared to your account from a partner account, you can choose which of the two accounts will be billed for the case. Tap on “Validate Case” to proceed with the validation.

-
When the validation is completed, it will briefly show a green confirmation onscreen.
-
After successful validation, the files will be ready for download.
How to download a PIC file and CAD libraries from PIC cloud
Once your PIC file is validated according to the previous instructions, follow these steps to download your assets from PIC cloud. Please note that an active PIC lab subscription is required to download PIC files and libraries from PIC cloud.
Note: PIC files in STL format can be downloaded from PIC cloud using any device. Library downloads are not available on smartphones.
-
Select and download the PIC file
- Open the validated case's page from the PIC cases page of PIC cloud.
- Click on the “Download PIC file” button. The PIC file will be downloaded in STL format.

- Select and download CAD libraries
-
- Click on the “Download Libraries” button.

- Select the design software format:
- exocad®
- 3Shape®

- Choose your design interface:
- Direct to implant/Abutment
- Indirect Component (Ti bases and others)

- After selecting both options, click on “Request Libraries”. PIC cloud will automatically display the available libraries for your case based on the scan markers that have been assigned to the PIC file.

- Click on the “Download Libraries” button.
If a specific library is not yet available on PIC cloud, a “Send Email” button will appear. Click on it to load a preset email that will open in your default email client containing all the relevant information for PIC dental's Support team. Send the email, and the Support team will contact you after the library has been added to PIC cloud.
If you are using a PIC system (not PIC app) and need a specific library for your dental design software, please contact PIC dental Support team directly.